gr-remotecar 使用GNURadio控制遥控小车
gr-remotecar
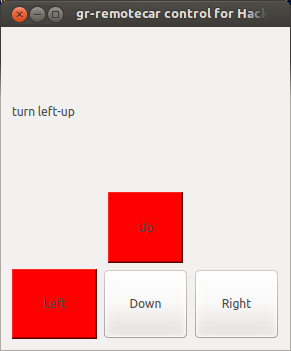
I wrote a GNURadio module to generate control signal for toy remote controlled car, and a Qt(PySide) GUI to listen keyboard press.
detail and source code:
http://github.com/scateu/gr-remotecar
Video DEMO
INSTALL
mkdir build
cd build
make
sudo make install
sudo ldconfig
TRY
refer to examples/
examples/WheelPulse/Wheel.py is a simple PySide based controller which you can control your toy car with keyboard direction keys. And it is for RemoteCarIIBaseBand
Just replay it.
on examples/tx.sh and examples/rx.sh , I demo how to capture the car’s remote signal and just replay it. And it turns out to make the car run.
cd examples
./rx.sh car.iq
./tx.sh car.iq
and it means:
hackrf_transfer -t car.iq -f 27000000 -s 8000000 -a 1 -l 30 -i 30 -x 40
27000000 is for 27MHz, you may find the frequency sign on you car’s remote.
Principle
We support two kind of remote car control :
RemoteCarBaseBand
                -->|TIME3  |<--   TIME4
      --------+    +-------+    +-------+    +--------- ... -------+    +---.....
              |    |       |    |       |    |                     |    |
              |    |       |    |       |    |                     |    |
              |    |       |    |       |    |                     |    |
              |    |       |    |       |    |                     |    |
              +----+       +----+       +----+                     +----+
              TIME0        TIME0        TIME0
           -->|                              TIME2                 |<---


    TIME0 = 520us
    TIME3 = 300us to 1.3ms
    TIME4 = 300us to 1.3ms
    TIME2 = 20ms
TIME3 and TIME4 control car’s accelerator and direction.
RemoteCarIIBaseBand
+----------+     +----------+     +----------+     +----------+     +-----+     +-----+
|          |     |          |     |          |     |          |     |     |     |     |
|          |     |          |     |          |     |          |     |     |     |     |
|          |     |          |     |          |     |          |     |     |     |     |
|          |     |          |     |          |     |          |     |     |     |     |
|          |     |          |     |          |     |          |     |     |     |     |
|          |     |          |     |          |     |          |     |     |     |     |
+          +-----+          +-----+          +-----+          +-----+     +-----+     +-...

|<-  3t  ->|  t  |<-  3t  ->|  t  |<-  3t  ->|  t  |<-  3t  ->|  t  |  t  |  t  |  t  |
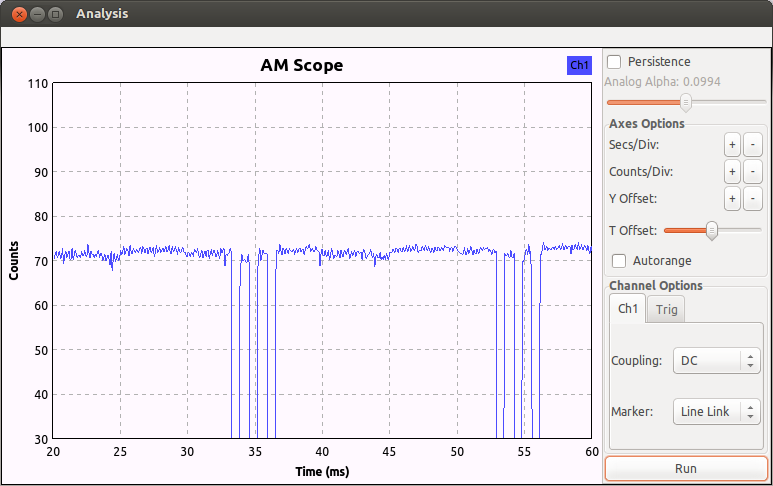
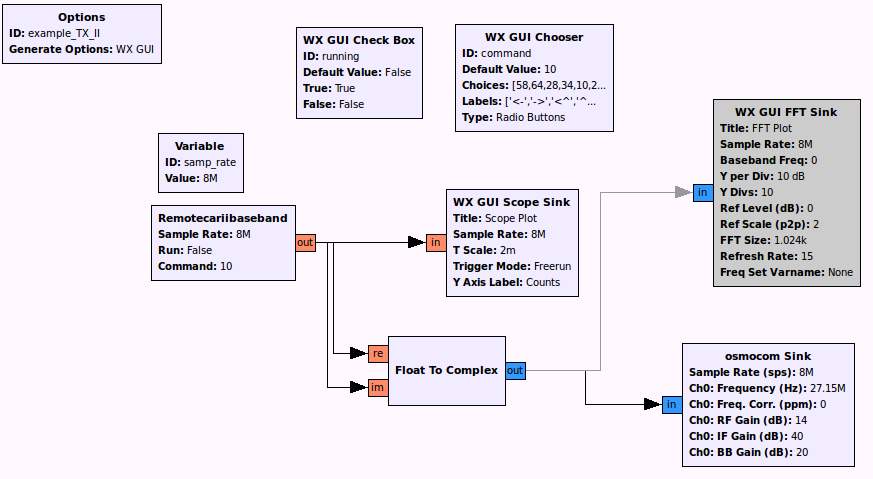
and we can simply capture it with HackRF using a AM demode gnuradio-companion workflow.

it is on examples/analysis.grc
Left: n=58
Right: n=64
Forward: n=10
Fast Forward: n=22
Backward: n=40
Left Forward: n=28
Right Forward: n=34
Left Backward: n=46
Right Backward: n=52
t = 0.55 ms
and you can try it with examples/WheelPulse/Wheel.py

遥控小车的信号分析与生成
直接重放
首先使用频谱仪或者查资料获知其频率在27.145MHz, 所以我们取中心频率为27MHz, 以8M采样率采回16M个点, 时长2秒
hackrf_transfer -r car.iq -f 27000000 -s 8000000 -n 16000000
重放, 注意优化它的发射增益
hackrf_transfer -t car.iq -f 27000000 -s 8000000 -a 1 -l 30 -i 30 -x 40
使用GNURadio对采集到的iq进行分析
控制信号分析结果
27.145MHz的遥控小车的信号大致可以认为是如下的PPM/AM波形:
PPM意为Pulse Position Modulation, 脉冲位置调制
                      TIME3         TIME4
      --------+    +---------+    +-------+    +--------- ... -------+    +---.....
              |    |         |    |       |    |                     |    |
              |    |         |    |       |    |                     |    |
              |    |         |    |       |    |                     |    |
              |    |         |    |       |    |                     |    |
              +----+         +----+       +----+                     +----+
              TIME0          TIME0        TIME0
           -->|                                TIME2                 |<---
其中的典型值为
TIME0 = 520us
TIME2 = 20ms
TIME3,TIME4 = [300us,1.3ms]
TIME3的时间长度控制了小车的左右
TIME4的时间长度控制了小车的油门量
用Python生成基带进行原理验证
import struct

SAMP_RATE=8e6
TIME_TOTAL = int(1 * SAMP_RATE) #s

TIME0 = int(520e-6 * SAMP_RATE)
TIME10 = int(300e-6 * SAMP_RATE)
TIME11 = int(1.3e-3 * SAMP_RATE)
TIME2 = int(20e-3 * SAMP_RATE)

Control0 = 0 #[0,1] 0.5 = stop orientation
Control1 = 1#speed

TIME3 = (TIME11-TIME10) * Control0 + TIME10
TIME4 = (TIME11-TIME10) * Control1 + TIME10

TIME_REST = TIME2-TIME0*3-TIME3-TIME4


MIN=struct.pack('B',128)
MAX=struct.pack('B',255)

def WriteFrame(value,quantity,f):
    j = 0
    while j < quantity:
	f.write(value) #i
	f.write(value) #q
	j += 1

def main():
    f = open('w.iq','wb')

    i = 0
    WriteFrame(MAX,1e-3*SAMP_RATE,f)
    i += 1e-3*SAMP_RATE
    while i < TIME_TOTAL:
	WriteFrame(MIN,TIME0,f)
	i += TIME0
	WriteFrame(MAX,TIME3,f)
	i += TIME3
	WriteFrame(MIN,TIME0,f)
	i += TIME0
	WriteFrame(MAX,TIME4,f)
	i += TIME4
	WriteFrame(MIN,TIME0,f)
	i += TIME0
	WriteFrame(MAX,TIME_REST,f)
	i += TIME_REST
    f.close()

if __name__ == "__main__":
    main()
然后生成了w.iq的原始基带数据.
如何查看它是否正确呢? 让我们打开gnuradio-companion来做出一个简单的信号流程来调试一下.
写GNURadio模块: 第二种车
信号原理分析
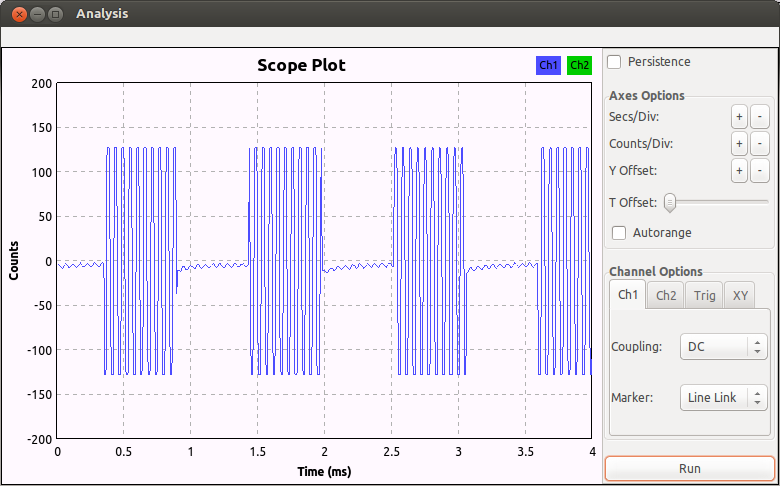
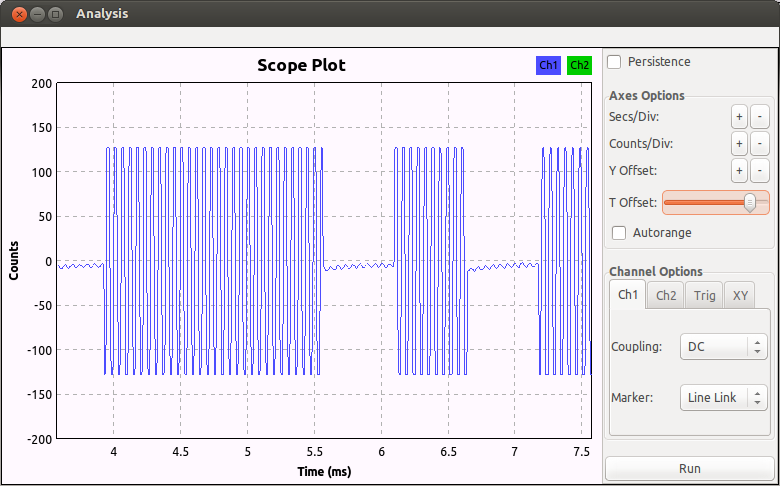
使用gnuradio-companion搭建AM解调, 然后输出到WX GUI Scope Sink里, 发现信号在27MHz是如下情形:
+----------+     +----------+     +----------+     +----------+     +-----+     +-----+
|          |     |          |     |          |     |          |     |     |     |     |
|          |     |          |     |          |     |          |     |     |     |     |
|          |     |          |     |          |     |          |     |     |     |     |
|          |     |          |     |          |     |          |     |     |     |     |
|          |     |          |     |          |     |          |     |     |     |     |
|          |     |          |     |          |     |          |     |     |     |     |
+          +-----+          +-----+          +-----+          +-----+     +-----+     +-...

|<-  3t  ->|  t  |<-  3t  ->|  t  |<-  3t  ->|  t  |<-  3t  ->|  t  |  t  |  t  |  t  |
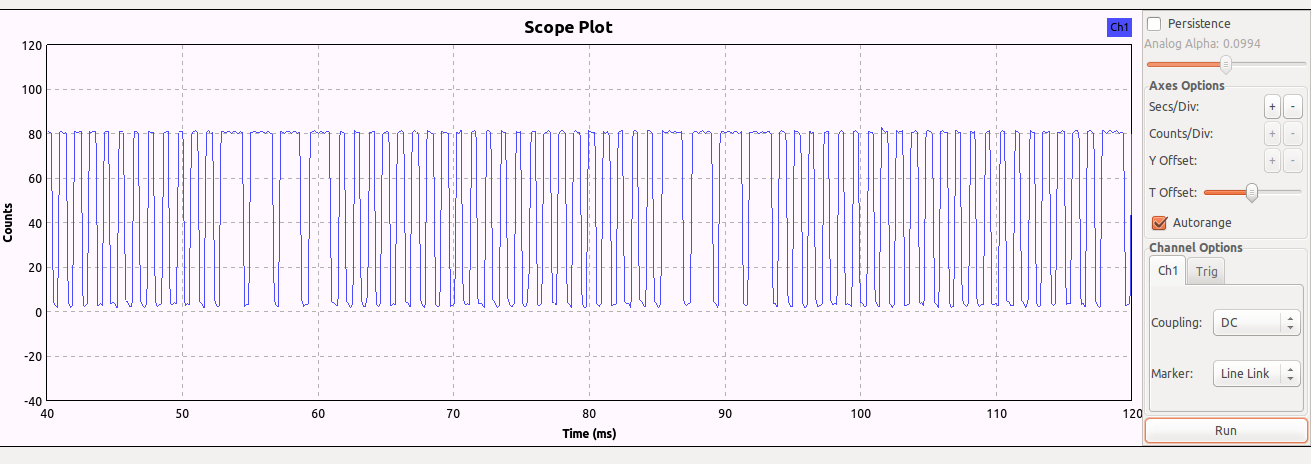
每个控制帧都由4个长脉冲和n个短脉冲组成
经过测试, 找到n的值如下:
左: n=58
右: n=64
1档前进: n=10
2档前进: n=22
后退: n=40
1档左前: n=28
1档右前: n=34
左后: n=46
右后: n=52
模块建立
$ gr_modtool new remotecar

$ gr_modtool add RemoteCarIIBaseBand -t sync
GNU Radio module name identified: remotecar
Language: C++
Block/code identifier: RemoteCarIIBaseBand
Enter valid argument list, including default arguments: double samp_rate,bool run, int command
Add Python QA code? [Y/n] n
Add C++ QA code? [Y/n] n
Adding file 'RemoteCarIIBaseBand_impl.h'...
Adding file 'RemoteCarIIBaseBand_impl.cc'...
Adding file 'RemoteCarIIBaseBand.h'...
Editing swig/remotecar_swig.i...
Adding file 'remotecar_RemoteCarIIBaseBand.xml'...
Editing grc/CMakeLists.txt...
写io_signature
在lib/RemoteCarIIBaseBand_impl.cc文件中:
RemoteCarIIBaseBand_impl::RemoteCarIIBaseBand_impl(double samp_rate,bool run, int command)
      : gr::sync_block("RemoteCarIIBaseBand",
	      gr::io_signature::make(0,0,0),
	      gr::io_signature::make(1,1,sizeof(float)))
添加所需变量
在lib/RemoteCarBaseBand_impl.h里加入
namespace gr {
  namespace remotecar {

    class RemoteCarIIBaseBand_impl : public RemoteCarIIBaseBand
    {
     private:
	     double d_samp_rate;
	     bool bool_run;

	     int n_pre;
	     int n_command;

	     int current_pre;
	     int current_command;

	     int current_sample_index;

     public:
      RemoteCarIIBaseBand_impl(double samp_rate,bool run, int command);
      ~RemoteCarIIBaseBand_impl();

      // Where all the action really happens
      int work(int noutput_items,
	       gr_vector_const_void_star &input_items,
	       gr_vector_void_star &output_items);
    };


  } // namespace remotecar
} // namespace gr
    ....
work
整个类的生命周期内一直存在,
GNURadio的调度器会调用work函数, 索取noutput_items个结果
生成grc
$ gr_modtool makexml RemoteCarIIBaseBand
GNU Radio module name identified: remotecar
Warning: This is an experimental feature. Don't expect any magic.
Searching for matching files in lib/:
Making GRC bindings for lib/RemoteCarIIBaseBand_impl.cc...
Overwrite existing GRC file? [y/N] y
grc中On Off的设置
参考: gnuradio/gr-wxgui/grc/wxgui_scopesink2.xml
<block>
  <name>Remotecariibaseband</name>
  <key>remotecar_RemoteCarIIBaseBand</key>
  <category>REMOTECAR</category>
  <import>import remotecar</import>
  <make>remotecar.RemoteCarIIBaseBand($samp_rate,$run, $command)</make>
  <param>
    <name>Sample Rate</name>
    <key>samp_rate</key>
    <type>real</type>
  </param>
  <param>
    <name>Run</name>
    <key>run</key>
    <value>True</value>
    <type>bool</type>
    <option>
	<name>Off</name>
	<key>False</key>
    </option>
    <option>
	<name>On</name>
	<key>True</key>
    </option>
  </param>
  <param>
    <name>Command</name>
    <key>command</key>
    <type>int</type>
  </param>
  <source>
    <name>out</name>
    <type>float</type>
  </source>
</block>
Stage 1通关测试
    int
    RemoteCarIIBaseBand_impl::work(int noutput_items,
			  gr_vector_const_void_star &input_items,
			  gr_vector_void_star &output_items)
    {
	float *out = (float *) output_items[0];

	for (int i = 0;i < noutput_items; i++){
	        out[i] = 1.5;
	}

	// Tell runtime system how many output items we produced.
	return noutput_items;
    }

加入基带信号生成部分
在lib/RemoteCarBaseBand_impl.cc里加入代码
RemoteCarIIBaseBand_impl::RemoteCarIIBaseBand_impl(double samp_rate,bool run, int command)
      : gr::sync_block("RemoteCarIIBaseBand",
	      gr::io_signature::make(0,0,0),
	      gr::io_signature::make(1,1,sizeof(float)))
    {
	bool_run = run; // output on off
	d_samp_rate = samp_rate;

	n_command = command; // command code
	n_pre = 4; // pre pulse number

	current_command = 0;
	current_pre = 0;

	current_sample_index = 0;

    }

    ...

    int
    RemoteCarIIBaseBand_impl::work(int noutput_items,
			  gr_vector_const_void_star &input_items,
			  gr_vector_void_star &output_items)
    {
	float *out = (float *) output_items[0];

	for (int i = 0;i < noutput_items; i++){
	        if (bool_run) {
	                if (current_pre < n_pre) {
	                    if (current_sample_index < d_samp_rate * 0.00055 * 3) {
	                            out[i] = 1;
	                            current_sample_index += 1;
	                    }
	                    else if (current_sample_index < d_samp_rate * 0.00055 * 4){
	                            out[i] = 0;
	                            current_sample_index += 1;
	                    } else { // a long pre pulse generated.
	                        current_sample_index = 0;
	                        current_pre += 1;
	                    }
	                }
	                else if (current_command < n_command) {
	                    // 4 pre long pulse generated, then generate other short pulse.
	                    if (current_sample_index < d_samp_rate * 0.00055 ) {
	                            out[i] = 1;
	                            current_sample_index += 1;
	                    }
	                    else if (current_sample_index < d_samp_rate * 0.00055 * 2){
	                            out[i] = 0;
	                            current_sample_index += 1;
	                    } else { // a short command pulse generated
	                        current_sample_index = 0;
	                        current_command += 1;
	                    }

	                }
	                else {
	                        // 1 frame generated
	                      current_pre = 0;
	                      current_command = 0;
	                      current_sample_index = 0;
	                }
	        } else { // muted
	                out[i] = 0;
	        }

	}

	// Tell runtime system how many output items we produced.
	return noutput_items;
    }
回调函数
如果没有回调函数, 那么生成的模块不能在gnuradio-companion里被WX GUI Slider实时的修改参数.
为了能够实时地控制小车, 我们需要加入两个回调函数.
在lib/RemoteCarBaseBand_impl.h里加入set_run和set_command函数的声明
namespace gr {
  namespace remotecar {

    ....

      // Where all the action really happens
      int work(int noutput_items,
	       gr_vector_const_void_star &input_items,
	       gr_vector_void_star &output_items);
      void set_run(bool run);
      void set_command(int command);
    };


  } // namespace remotecar
} // namespace gr
    ....
还需要在include/remotecar/RemoteCarIIBaseBand.h加入set_run和set_command的声明
   class REMOTECAR_API RemoteCarIIBaseBand : virtual public gr::sync_block
    {
     public:
      typedef boost::shared_ptr<RemoteCarIIBaseBand> sptr;

      static sptr make(double samp_rate,bool run, int command);
      virtual void set_run(bool run) = 0;
      virtual void set_command(int command) = 0 ;
    };
在lib/RemoteCarIIBaseBand_impl.cc里加入set_run和set_command的实现
    void RemoteCarIIBaseBand_impl::set_run(bool run) {
	    bool_run = run;
    }

    void RemoteCarIIBaseBand_impl::set_command(int command) {
	    n_command = command;
    }
最后, 在grc/remotecar_RemoteCarIIBaseBand.xml文件里加入
  <make>remotecar.RemoteCarIIBaseBand($samp_rate,$run, $command)</make>
  <callback>set_run($run)</callback>
  <callback>set_command($command)</callback>
  ....
编译
mkdir build
cd build
cmake ../ && make && sudo make install && sudo ldconfig
然后重启gnuradio-companion即可看到效果